3kW Solar System Cost in India 2026: Real 4 Month Experience, Subsidy, EMI and Electricity Bill
For the last four months, a 3 kW solar system has been in use at home, so sharing a complete experience and review. This includes how the bank loan process works, what documents are required, EMI details, subsidy timeline, and a few practical things that only become clear after installation.
Solar usually makes sense for households where the electricity bill is above ₹1000 to ₹1500 per month. Earlier, during summer months, the bill used to touch ₹4000, and in normal months it stayed above ₹1500. Because of that, installing solar felt like a practical decision. Instead of paying the electricity bill every month, the idea was to pay around ₹2000 EMI and own a solar system.
Applying for solar
Applications are done through the PM Surya Ghar Yojana portal. The process is online, but in reality most of the work is handled by the local distributor. Once contacted, they usually guide through the entire process.
Before deciding, enquiries were made with other companies including Tata and Truzen. Finally a local installer was preferred because service and support are easier when the company is nearby.
Cost of the 3 kW system
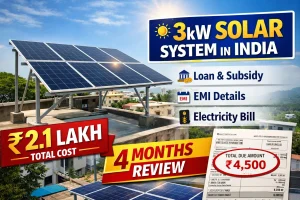
The total cost for this 3 kW solar setup was around ₹2,10,000.
- Loan taken: ₹1,89,000
- Cash paid: ₹21,000
The amount someone pays directly depends on their loan eligibility. Full payment is not compulsory.
Some installers offer systems between ₹1.8 lakh and ₹2.1 lakh. Price differences usually depend on the type and quality of panels used.
Bank loan process
After applying on the PM Surya Ghar portal, the next step is applying for a bank loan. At present, loans for this scheme are mainly provided by government banks like Indian Bank and Indian Overseas Bank.
The process usually takes 2 to 3 days if all documents are ready.
Required documents include:
- Aadhaar card
- PAN card
- Own house proof
Solar under this scheme can only be installed on an owned house. It cannot be installed on rented houses. Also, the loan must be applied in the same name as the electricity bill holder.
At the bank, an account is opened and loan forms are filled. Around 40 to 50 signatures may be required during the process.
After that, bank officials visit the house for verification. They check whether the property is owned and also take photos of the location where solar panels will be installed. Once verification is completed, the loan is usually sanctioned within 4 to 5 days.
The loan amount is transferred directly to the solar distributor’s account, while the government subsidy is credited to the customer’s bank account.
Installation details
Once the loan is approved, installation starts quickly.
In this case, Polycab materials were used along with premium bifacial solar panels. Bifacial panels generate electricity from both sides, which helps improve overall output.
One important suggestion during installation is about the panel structure height. Many installers offer a 6 x 4 structure, which sits lower on the terrace. But installing a higher 8 x 6 structure is better if space allows. A higher structure keeps the terrace usable and prevents the entire roof area from being blocked.
It is also better to clearly discuss the following things with the installer before paying:
- Structure height
- Panel type
- Cement support blocks for pillars
Once payment is done, negotiating later becomes difficult. Getting the details written clearly helps avoid confusion.
Smart meter installation
After the solar setup is completed, the electricity department installs a smart meter. The old meter is removed and replaced with a new one. The service number remains the same and electricity billing continues as usual.
Once the smart meter is installed, the solar system starts functioning.
On grid solar behaviour
This system is on grid solar. One important thing to understand is that solar generation happens only when grid electricity is available. Even if sunlight is strong, the panels will not operate during a power cut.
Off grid systems work differently because they include batteries, but they are more expensive. Hybrid systems combining both technologies are also available now, though they cost more.
Monitoring power generation
The installer provides a mobile app where solar generation can be checked.
Through the app it is possible to track:
- Daily power generation
- Monthly unit generation
At present, with mixed weather conditions and some rainfall, the system generates around 380 to 400 units per month. During peak summer the highest daily generation recorded was 19 units in one day.
Keeping the panels clean is very important. Dust collects on rooftop panels and affects output. Cleaning them once a week with water helps maintain good power generation.
Subsidy timeline
The government subsidy was credited within about 45 days directly to the bank account. That amount was used to reduce the loan balance.
Subsidy timelines may vary depending on government processing. Sometimes it may come earlier, sometimes later.
First electricity bill surprise
After installing solar, many people expect the electricity bill to become zero immediately. But the first bill can be around ₹4500 because the cost of the smart meter installation is included in that bill.
From the next month onwards the bill reduces significantly, but it does not become completely zero.
Even with solar installed, there are still fixed charges and FCA charges. These charges come to around ₹300 to ₹350 per month.
Earlier these charges were around ₹150 to ₹160, but they increased later. Because of this, even solar users continue to receive a small monthly bill.
So expecting a completely zero electricity bill may not be realistic. Energy charges become zero, but other charges still remain.
EMI and loan repayment
The EMI initially was ₹2195, but after the RBI repo rate reduction, the interest dropped and the EMI reduced to around ₹2000.
After adjusting the subsidy amount, the remaining loan repayment period is around 4.5 years.
The bank app clearly shows:
- EMI amount
- Due date
- Loan balance
Timely repayment is important because it affects the CIBIL score.
Overall experience after four months
The main reason for installing solar was a monthly electricity bill above ₹1500. Solar panels typically have a life of around 25 years, while the loan gets cleared within about five years. The expectation was that the remaining years would bring long term savings.
However, because of fixed charges of around ₹300 to ₹350 per month, the bill never becomes completely zero. Earlier the higher bills mostly came during summer months. Now the bill stays small but consistent every month.
Apart from that, the system has been working well. In the first four months there have been no technical issues with the solar panels or installation.
Extra unused solar units are supposed to be settled every three to six months, according to the distributor. Whether the amount actually gets credited depends on the electricity department and settlement cycle.
Final thoughts
Solar can still be a good option for homes with consistently high electricity bills, especially above ₹1500 per month. But it is better to install it with realistic expectations.
The electricity bill may reduce a lot, but some monthly charges will still remain. Proper installation, good panel quality, and regular cleaning make a big difference in performance.
The installation discussed here was done in AP and this review reflects the experience after using the system for about four months.